Wednesday 15 August 2012

Day 13 - Ipod Case

This was just a really quick and easy project today. My poor Ipod has suffered a lot over the last couple of years kicking around in the bottom of my handbag and getting scratched and scuffed, so I thought it was finally time to make a nice cozy case for it.

For this I just used some soft knitted fabric I had (it used to be the sleeve of a jumper) and some pretty scrap fabric I had to make the outer cover. I sewed them both together with right sides facing and leaving a small gap to turn it right side out through, which I then sewed up. Then I laid my Ipod on it so I could see how much to turn it up by to make the pocket and topstitched it closed. Then I hand sewed a hair band to the inside of the top flap and sewed a button on to the middle of the back to act as a closure. (The hair band that I used was quite old and stretched out, you might not need to sew your button so far away!)

Then you're ready to slide in your Ipod, chuck it in your bag and go.

Front

Back

Open

Day 12 - Sewing Machine Pin Cushion

This is an idea I found on Pinterest and instantly thought it was genius. The original tutorial can be found here on I Can Find The Time's blog, but this is my attempt.

You just need two pieces of fabric to make a tube out of, some scraps to stuff it with, and a ribbon cut in half to tie it round you machine.

Firstly you need to lay the fabric right sides together with one piece of ribbon in between, a ribbon sandwich if you will. Sew that side down, then do the same on the other side with the other piece of ribbon. Then sew the top and bottom edges down, making sure you sew the ribbon down too! You also need to remember to leave a gap so you can turn the whole thing right side out and put the stuffing it.

Once you've stuffed it, close the gap up, tie it round your machine and you're done! Unless you're me, and you forget to sew the ribbon in to the seams. If you do that, then just sew the two bits of ribbon to either side at the back, once it's tied to your machine, who's going to see it anyway?


Day 11 - Roll Up Pencil Case, Another Scrap Buster

Yesterday I made a pen roll for my nice coloured fineliners. Today I wanted to make a similar one for the rest of my pens and pencils, again using up scrap fabric that I've had lying around for ages.

This one is dead easy, you just need two pieces of fabric that are wide enough to fit all your pens and pencils in and that are double the length of the longest pen/pencil you're putting in it (because you're going to fold the flap over before you roll it up), plus seam allowance. You also need a third type of fabric to make your pockets out of, plus a ribbon to tie it together when you roll it up.

Sew your two pieces of fabric together right sides facing, leaving a gap so that you can turn it inside out , once you have turned it the right way round, sew this hole up. Then cut out your pockets, measuring them so they are roughly the length and width you need then to be.


I used pinking shears to cut the pockets and then just top stitched them (it's easy and it looks quite nice).  I then hand stitched the ribbon to the centre of the roll, but roughly a quarter of the way up, this means that when you fold the top over, the ribbon should be almost dead centre. (I roll mine up so either side meets in the middle, however if you roll yours from end to the other, you need to position you ribbon to allow for this)

Then just fold the flap over, roll it up and off you go!

Flap folded over

All rolled up and ready to go!

Day 10 - Scrap Busting Pen Roll

I've been attempting to organise my study/craft room over the last couple of days, and in the process realised two things: firstly, I have way too much stuff, secondly, I have nowhere near enough storage. So in a bid to resolve these two issues I have been coming up with ways to use up my huge amount of scrap fabric and create some useful storage solutions. The first item on my list was to organise my art box (which is pretty much just a cardboard box full of pens and pencils tied together with hairbands, paints, chalks, paintbrushes tied together with hairbands etc. that I have accumulated over the years.

So here is my first stash buster; a pen roll (or pencil roll, depending on what you choose to put in it)


It was quite an easy project, I mostly made it up as I went along. Here's what you need, two pieces of fabric, one for the outside, one for the inside; a button and a hair band for the fastening; and of course your machine and sewing gubbins.

Firstly you need to roughly measure the length of the pens/pencils you want to put in it and then add your seam allowance on. As you can see from the picture above, I managed to mess that bit up and forgot to factor in a seam allowance. I actually quite like the fact that the pens stick out over the top though, it means you can grab a pen easily without having to unroll, but that's really personal preference.

Because I was using up scraps, I didn't have two pieces of fabric that were the same length and height, so used an off cut of the outer fabric on the inside as well.

Apologies for the awful picture!

So what I did was essentially make an envelope cushion (I think that's right anyway!) I laid the pieces right sides together, making sure that the blue flowered fabric was underneath the pink one (that way when you turn it inside out everything is the right way round) Then you just sew all the way round, leaving a gap so you can turn it the right way round. If you're really anal about ironing seams then you can do that before turning it round. If, like me you hate ironing seams because it means ironing, then don't bother, I quite like the homemade, rustic look! Once you've turned it the right way out, close up the gap and get ready to sew the tubes.

Measure where you need the first seam to be and sew. Then (and this is the bit I strongly recommend) put the pen in the tube and measure where the next seam needs to be. I know this seams a bit time consuming, and you may be saying "why don't I just measure out where all the lines need to be and just sew away" BUT if you want your pens to fit snugly, this is the best way to do it. It may feel really awkward and cumbersome to be sewing straight lines when half your roll has pens in it, but it really does make a difference - it will literally be made to measure for your pens and there is no way they will be falling out without a fight.

Once you've sewn all the seams and your pens are all snug and warm, just sew your hairband to one end and roll the whole thing up so you can work out where you need your button to go. My hairband was really stretched out because it was the same hairband I've been using to keep my pens together. Conveniently my button need to sit just behind where I'd sewn the hairband so it looks neat and tidy. 

I'm pretty chuffed with the end result, and it really didn't take me very long at all. Plus, it makes my art box look so much neater. Once I have completely organised my art box there may be a picture....

My pretty pen roll. It even has extra space on the end incase I need it


Saturday 4 August 2012

Day 9 Shoe Update Number 3

This is an update that I was massively excited about doing because it involved GLITTER! I freakin' love glitter, I mean, who doesn't?

Right so, glitter shoes have been all over Pinterest, but my favourite pair has to be these from A Beautiful Mess ( which incidentally happens to be one of my favourite blogs).

This is so simple, and so messy, but so worth it. I strongly recommend doing this over a piece of newspaper, or a big enough container, so that you catch the glitter and reuse it. First of all, I painter my pumps using acrylic paint. The glitter I wanted to use was a turquoise colour, so I painted my pumps green, because some of the shoe underneath will show up no matter how much glitter you use! Once the paint had dried, I painted on the PVA glue working in small sections, you don't want the glue to dry before you've managed to sprinkle on enough of your glitter. When you've covered the whole of your shoes, let them dry completely, I left mine for 24 hours. Once they've dried, touch up any patches, let dry for another few hours, then paint a thin layer of glue over the whole of the shoe. You want to be careful when you do this, because some of the glitter will come aways when you brush the glue on, so be gentle. When you've painted glue over the whole of your shoes, let them dry for another 24 hours, and there you have it, one amazing pair of sparkly shoes!

Day 8 Another Shoe Update

Clearly I'm not good at this blogging everyday, I promise to do better!

After my first post where I updated a pair of old pumps, I decided to update a couple more of my pumps (I have about 10 pairs that will all eventually be given a new lease of life).

The idea for the first update came from See Kate Sew. She did a series of shoe updates, which are all amazing, but my favourite idea of hers combined two of my favourite things, shoes and books. Kate used modge podge to stick strips down that she had cut from a dictionary. I don't think we get modge podge in the UK, but from what I gather, it's basically PVA, so that's what I used to stick down the strips of paper I cut from a spare copy of The Complete Works of Shakespeare that I had kicking around (I've already used some of the pages in a previous post to cover boxes and folders).

This is a very simple crafts to do, just go round the shoe in sections pasting on the glue, then sticking down the page strips and gluing over the top. Don't worry about any overhang, as you can trim this down once the glue has dried. When you have covered the whole shoe, paint a thin layer over the whole of the shoe and let dry. You will find that the paper cracks when you walk, just glue over the top and the shoes will move with your foot without peeling. I have found however that the edges of the paper on my shoes has come away a lot, so I'm going to go back over them with a generous layer of glue!

Monday 30 July 2012

Day 7 Bookmark DIY and all up to date!

So I've spent the majority of the day getting by blog up to date, and from hence forth I will attempt to post them each day because doing four posts in one day is just too much work!

After all this writing, I wanted to do something quick, easy and very simple, so this is what I plumped for. It's a really easy tutorial from Percolating Projects, and all you need is a piece of ribbon that will go round your book (I used a piece of scrap fabric), a hair band and button.

If you're using a ribbon then the long edges will already be finished, however, if you are using up a piece of scrap like I am, then you can either jut sew a seam down either side, or you can sew right sides together, making a tube, then turn it inside out, which is what I did. Then I rolled one end over twice and sewed it down, making a secure seam, while the other side I rolled over twice and then sewed it down with the hairband secured inside. Then just sew a button on the other end and job done! Check out Percolating Projects for a full tutorial with pictures.
My lovely new bookmark


Day 6 Bakewell Tarts

This is not actually the first time that I've made these Bakewell tarts, I think this might be the fourth time I've them in fact - they are just so tasty! And this recipe is so easy as well. I found it on a blog called The Caked Crusader which has a really easy recipe for you to follow and they are delicious.

Check out The Cake Crusader's blog for the full recipe, but very simply you just make the pastry, then while that is chilling, you beat 100g of butter with a 100g of caster sugar, then you beat in two eggs and 50g of ground almonds (the recipe says to beat in one egg, then half the almonds, then the other egg and the rest of the almonds, but I have made it by just chucking them all in at the same time and it worked out fine) then you whisk in 50g of flour.

To assemble the tarts, you need to roll and cut out the pastry, place the individual pastry pieces into a greased muffin or tart tin, then put a small amount of jam in the bottom of each pastry case and top of with a generous dollop of the almond filling. Then you just stick them in the oven at 180º for 20 mins, let them cool, and ice them. Dead easy and really yummy!


Day 5 Red Velvet Birthday Cake

So the present is all sorted for the birthday boy and on Saturday I made his cake. When I asked him what cake he wanted, he requested a red velvet cake. Red velvet is not a cake I have ever made before, it being an American recipe, so I went on a google search to try and find a good one. This is the recipe I went for, it had five star reviews, loads of positive comments, and best of all, lots of people said it was really easy.

I was a bit dubious about the recipe to begin with. As a Brit almost every cake I have ever made, bar a carrot cake, has been made with butter, whereas this one had vegetable oil and buttermilk instead. However, I went with it, although I did put less salt in than the recipe called for (the recipe said to use teaspoon of salt, and I just couldn't bring myself to put that much in!) I was also a bit light on the food colouring. It said to add 1-2oz red food colouring, but didn't specify what sort of colouring to use. I just used the liquid stuff you get in the supermarket, which is not as strong as some. I have also seen recipes that use beetroot juice for the colour, but as a confirmed beetroot hater, there was no way I was going to use that!

Although this recipe doesn't tell you how to make the cream cheese topping, there is a link on the page to another site for this part, however, after taking a look at the topping recipe, I decided to go with one I already had. This is a Nigella Lawson cream cheese topping that she uses for her chocolate guinness cake (which is amazing and I would definitely recommend giving it a whirl, you can find the recipe here)

For the topping I whisked 300g cream cheese (I used Philadelphia) until it's soft, then sieve over 150g icing sugar and whisk together then beat in 125ml of double cream. It makes an ah-mazing topping. Just a quick side note here, originally I had intended to use the cream cheese as a filling as well as a topping, but my recipe didn't make quite enough, so I would recommend times-ing the recipe by at least another half, if not double. Of course by the time I'd realised this, I'd already sliced the cake in half! I haven't completely decided yet, but I'm either just going to make more topping and cover the other cake as well, or I might use the other cake in a pudding, perhaps a trifle...
A half eaten red velvet birthday cake!

However this cake was yummy. I originally thought it was going to be really sickly, but it turned out to be just the perfect amount of sweet and it was so moist and light, I will definitely be making this one again!

Day 4 Zombie Survival Kit


This is a challenge that I have really been looking forward to doing and I've been planning it for a couple of weeks. The 29th is (or was) my boyfriends birthday, he is now the big 2 6 and is not necessarily overjoyed at this, so I wanted to do something fun for his birthday present that would make him feel like a bit of a kid again. There are three things you need to know about my boyfriend for this to make sense: firstly, he will always choose lots of little presents over one big one (there's more to open that way!); secondly, he loves sweets of pretty much any kind; and thirdly, he is a little bit mad on zombie horror, in fact World War Z by Max Brooks is one of his favourite books.

Anybody guess where this is going? Well you may or may not have seen this pin that has popped up a few times on Pinterest, it's a Zombie Survival Kit that a dad made for his sons birthday, and quite frankly, it's genius! I spotted it a couple of months ago and have been sitting on the idea for a couple of months, and last week I finally got to put it together. It took a fair bit of planning because I needed to have a flick through Max Brooks "Zombie Survival Guide" which goes with World War Z and which my boyfriend also has to see what you actually need to survive a Zombie attack. Then I had to work out what I was going to use in place of all the weapons and equipment that Brooks suggests. This is the list I came up with:

Weapons
Super soaker (one that looks a bit like a machine gun)
A small plastic gun that shoots lightweight plastic balls
A giant bubble maker in the shape of a dagger
Rhubarb and custard rope sweets that I wrapped in tin foil and bent to look like a crow bar
Two kinder eggs wrapped in a bit of black bin liner to look like hand grenades
Three rolls of wine gums wrapped in red paper to look like sticks of dynamite
Gummy Meerkats put in a tin labelled "Ammunition"
A pack of small black rubber bouncy balls that could be small explosives (to be honest I just bought these because I thought they would be fun!)

Equipment
Hip flask (in place of a water canteen)
Long marshmallow rope tied to look like an actual length of rope
Tubes of smarties wrapped in red paper to look like emergency flares
Pack of batteries
A lighter
A chocolate cigar
A tube of sweets in spray form wrapped to look like a torch
Socks (he always needs new socks on account of constantly putting holes in them. Plus Brooks did recommend spare socks)
A round tub of bubblegum tape made to look like a compass
A box of matchsticks (the sweets) wrapped to look like matches
A Terry Pratchett book that he wanted for something to read to cheer him up during the Zombie attack!
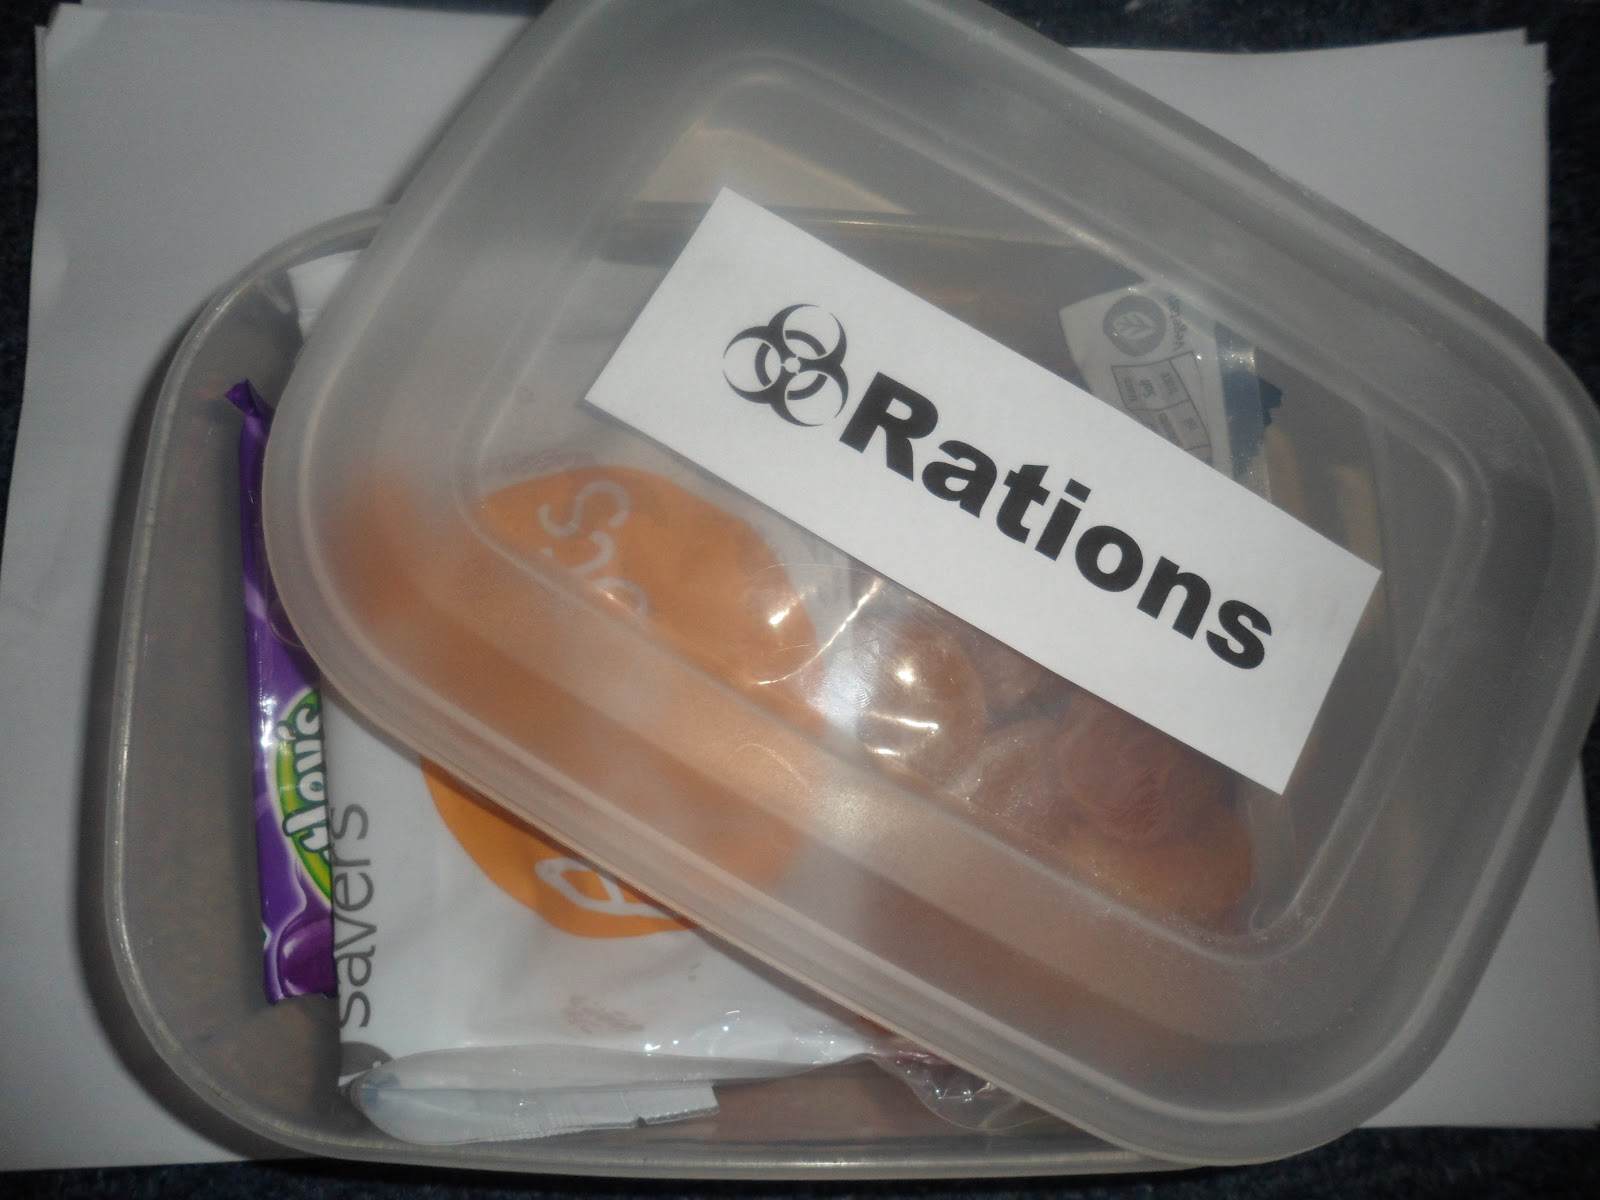
Rations - two packs of raw jelly, two mars bars and a packet of dried apricots


First Aid
Socks rolled to look like bandages
A tub of marshmallows labelled "Cotton Balls"
A pack of Kinder Egg hippos wrapped to look like antiseptic wipes
A tub of dolly mixture labelled "Antibiotics"


I also wrote a sort of cover letter, check list and advice pages, which were just a bit of fun, you could make your own up.

I though I would post some images of the sweets so you could see how I made them look like Zombie survival equipment.
     
The rope sweets wrapped to look like
a crow bar
Kinder Eggs wrapped to look like hand grenades (not very
convincing I know, but it was the best I could do!
Wine gums wrapped in red paper and tied together with
cross stitch thread to look like dynamite
Meerkat gummy sweets
All the "explosives" in the same tin. I just googled the image
and stuck it on with double sided sticky tape
Tubes of Smarties. I got the symbol off google images and
just typed the text into word
Chocolate cigar "for use only when the end is nigh"
Spray sweet wrapped to look like a torch. I coloured a piece
of white paper with a yellow crayon and then wrapped it
over the end before wrapping the paper round the top. Then
I cut a little piece of paper to look like a switch.
I printed a picture a compass face, then cut it out and stuck it
to the top of the tub of bubblegum tape (sorry for the awful
image, I blame the camera!)
This image was taken from google images, printed and wrapped
around a box of matchsticks
I put most of the "equipment" in one tub
With the hip flask
And the socks
Box of rations
Socks rolled to look like bandages
Tub of "Cotton Balls"
Box of Kinder Eggs hippos. The image was from google images
Tub of dolly mixture
Once I'd made everything look how I wanted them to, I got a cardboard box with a removable lid, then wrapped it in white paper, printed out a Zombie Survival Kit label, which I got from google images, and stuck it to the lid. Then I just had to fit everything in. It took a few goes to get it all in, but I was massively proud with the result.


Everything inside the box. By the way that weird looking thing in the right
hand corner is the marshmallow rope!
And with the "So you're facing a Zombis attack?" pack that I wrote
And with the lid on!

James (the boyfriend) was pretty chuffed too, phew! Now the pressure is on for him to come up with something equally as good for my birthday in October!


Days 3, 4, 5 & 6

I may have already failed at my challenge of posting on this blog everyday, but I have been crafting everyday (promise). The last few day have been a bit crazy, I got another job (at Cath Kidston, whoop!) and between my new job and the job I already have at a local cafe, I was working a lot of hours, and then it was my boyfriends birthday and I made him an awesome present and then took him out for the day (more on that later)

For my Day 3 challenge, I wanted to make a slip cover for my pouffe in the living room (I think in America you call them ottomans). Basically when we moved in to our flat, we brought two sofas with us, the first one got in through the front door, down the hall and into the living with no dramas. The second one got jammed in the front door and we couldn't get it in or out! My dad eventually took a hack saw to the frame and it ended up in the tip, but not before I'd rescued the two seat cushions, they were just too comfy not to salvage! For the last 9 months I've had the cushion stacked on top of each of other with a blanket draped over the top, they make a great footstool and it's always good to have an extra seat for when people come round. I've been intending to make a proper slip cover for my make shift pouffe since then, and while searching Pinterest the other day, I found this great tutorial by Design Sponge, so I though I would give it a go. For the full tutorial click on the link above, I will just give you the basic gist, but it really wasn't too difficult, and I'm really just a beginner with sewing.

Ok, so you need, whatever you want to cover, your fabric (I used quite a stretchy knit that I got from a charity shop, it's got a really retro pattern on it and has silver thread running through, it, it's awesome!), measuring tape, fabric scissors, pins, and of course, your sewing machine.

Firstly, measure the top of your pouffe to get a measurement for the width and length. Mine is 24"wide and 28"long. Then I measured the height of the sides (12") so each of the four sides are 12"high and 28"long. Cut out your pieces to these measurements, allowing for your seam allowance (again for the full tutorial check out Design Sponge) Don't forget that if you are using a patterned fabric, to make sure that the pattern is the right way up! Then you just need to sew the sides together and iron the seams flat, then sew the top piece to your tube of sides and iron the seams flat, hem it and that's it your done! Told you it was easy didn't I? I did check that my slip was going to fit after each stage, so that I could let out or take in if necessary, but me fabric was quite a stretchy knit, so it needed to be a bit snug.

I absolutely love me new pouffe cover, it looks so much better than it was before, and the best bit is that I made, AND it only took me about 45mins from start to finish. If you're a better and faster sewer than I am, then it would probably only take you about 20mins. Magic!
Before

After!

Tuesday 24 July 2012

Day 2 Cover those boring boxes and folders!

This craft has always been one of my most favourite things to do, it's perfect to do whilst sat watching the telly, but it's also messy enough to not be boring. What is it? Decoupage!
I keep all of our paperwork and documents at home in plain old ring binders, and anything sentimental  that I can't bring myself to throw away (which is virtually everything) I keep in old shoe boxes. But when we moved into our flat, the only place to keep these folders and boxes was on a bookshelf in the living room in plain view, and they did not look very attractive. But rather than invest in new decorative boxes and files from the high street, I decided to cover the ones I had.

What you need:

  • The item that you want you cover (boxes,folders etc.)
  • Paper to cover them in (I used pages from a spare copy of The Complete Works of Shakespeare that I had kicking around, but you could any type of paper really)
  • Craft glue
  • Paint brush
Firstly you need to spread an even layer of glue on to a patch of whatever it is you're covering. I found it was best to work in small sections at a time so the glue didn't dry before I had a chance to stick anything down.

You will also need to paint glue over the top of each page or piece of paper as well to make sure it sticks properly and you get a smooth finish.

Keep layering up your pages until you have covered the entire object. I had to do a few layers on some of my boxes  because the colour of the box and some of the writing showed up under just one layer. Alternatively I guess you could paint the box or folder first, but I had loads of pages spare and I quite like the layered look.

Once your box or folder is completely covered, paint another coat of glue over the whole thing just to make sure everything is stuck down properly and to protect the paper a bit, let it dry and you're done! Easy Peasy.

My finished boxes and folder


I'm really pleased with these, they do have some bubbles in where I didn't put enough glue on or smooth the page down enough, but I quite like the look, I think they go with the yellowyness of the old book pages. I am going to cover the blue cord handle of the bigger box, probably in some vintage scarp fabric that I will just wrap round it and tie at the ends. This craft is massively addictive, I'm now going on a decoupage spree round the flat, covering everything in site in old book pages!

Monday 23 July 2012

Day 1 Fabric Shoe Update

For my first attempt I thought I would do something fairly simple. This isn't a craft that I actually got from Pinterest, but I did get the inspiration from this post by Allison at Dream a Little Bigger, which I did find on Pinterest. As I have about ten pairs of the same pumps from Primark which are all looking a bit grubby, I wanted to give them a new lease of life. I love the lace that Allison used on her pumps, but I needed to cover my shoes entirely because they are definitely looking a little worse for wear.

What you need:

  • A pair of pumps
  • Enough fabric to cover both shoes ( I used a Cath Kidston Spots fabric)
  • Fabric scissors
  • Craft glue
  • Small paint brush
These aren't the actual pumps that I covered, I forgot to take pictures of any of the stages that I actually did!
Oh, and please excuse the terrible photography.

  • Firstly you need to measure your fabric against your shoes. I laid the fabric against the sides of the shoes and cut enough length of fabric to cover from the centre back all the way round to just beyond the middle of the front of the shoe (don't worry if you miss calculate this bit, we can rectify that later) I found that cutting the fabric to roughly the shape of the sides of the shoes helps, otherwise you have to tuck the excess fabric under which just looks messy.
  • Glue a strip down the centre back of the shoe and stick the fabric down ( I folded the fabric under slightly so that I had a neat edge) then glue a strip all the way down the side of the shoe. It's best just to glue a thin strip close to the sole, otherwise you may find that your fabric goes a bit crispy once the glue has dried. Follow the line of the shoe with the fabric round to the front, again for this I tucked the fabric under slightly to get a smooth line. This is where cutting the fabric to the shape of the shoe helps, because otherwise you have loads of fabric that you would have to tuck under and they would end up looking really bulky.
  • Depending on what look you want for the top edges of the shoe, you can either glue all around the top edge and repeat the tuck-under-and-stick step, or you can fold the fabric over and into the shoe, which is what I did. You will need to snip the fabric to fit the curve, but as I used a slightly thicker fabric, I found this was more secure. It doesn't look too special on the inside, but once your foot's in it, who's going to notice?


  • If, like me, you didn't quite have enough fabric to cover the toe nicely (again I would suggest tucking the fabric under for a neat edge if you did) then simply cut another piece of fabric and stick it across the toe. If you glue a strip on either side of the shoe and tuck the fabric under before glueing, then it looks fairly neat. Then you just have to snip the fabric and tuck it inside the shoe. Getting a neat looking line around the edge, and particularly the front of the shoe, is quite fiddly, but if you're using craft glue then you have plenty of time to play around before the glue dries.


And there you have it, your spangly brand new old shoes.


Sunday 22 July 2012

First Post

So here goes, my first ever post on my first ever blog! I've seen a few of these 365 day challenges on the internet, one of my favourites is this blog (if you haven't checked it out, then you seriously have to) So anyway, I decided to have a crack at my own challenge, and as I am one of the many Pinterest obsessed who spend hours pinning and not much time doing, I thought this would be the perfect way of making sure that I actually make the crafts I pin. So each day for 365 days I will be attempting to make all the amazing clothes, crafts and recipes that other people are clever enough to come up with. I am anticipating plenty of failures, but I guess we will have to see how it goes!